A Widget is the fundamental building block of Flutter. There is even a saying in the Flutter community that everything is a Widget. But what does that mean, and how does it work?
Two Types of Widgets
In Flutter there are 2 types of widgets that you can use. StatelessWidget and StatefulWidget. Now there are some smart people on the Flutter team, and you can see that they chose these names carefully. I bet you know the difference between the two without me even having to explain it.
StatelessWidgets are State-Less while StatefulWidgets are State-Full. The first one doesn’t have a State associated with it, while the second one definitely does. But what is a State?
What is a State?
The simple version is that the state is just data that can be changed (within a widget). If you are just displaying something to the user that cannot be altered, like some static text in your app, that does NOT have any state. But if you were displaying a counter that can be triggered to count up or down within your application, that count value would be considered your state.
Stateless Widgets
So StatelessWidget does not contain any state. You are simply adding it into the Widget Tree of your application to display something. And what it looks like depends on the configuration of the widget itself and the BuildContext. Some examples of StatelessWidgets are Text, ListTile, and FlutterLogo.
Although a StatelessWidget can’t change, it can be completely rebuilt (which is a normal thing that happens in a Flutter app all the time). It can be built or rebuilt in 3 different situations.
- The very first time it was built.
- If it’s parent widget changes.
- If your widget depends on an InheritedWidget, whenever that changes.
Stateful Widgets
StatefulWidgets are themselves immutable, just like StatelessWidgets, but they hold a separate State object which is created by calling the createState method.
class MyHomePage extends StatefulWidget {
  const MyHomePage({
    super.key,
  });
  @override
  State<MyHomePage> createState() => _MyHomePageState();
}
Each StatefulWidget comes with 2 classes. First the StatefulWidget itself and then a State widget which holds the build method and all the logic.
Within this State, you can add variables (aka the data or “state”) that can be manipulated. And every time it is manipulated, if you want to trigger a rebuild so that your app UI gets updated, you do that using setState.
So along with all the options we had to rebuild a StatelessWidget, we have one more option of rebuilding here, which is by manually causing it to update, whenever your data changes.
Whenever you create a flutter project the started application is a counter app with a very simple StatefulWidget that increments the counter. Whenever you press the + icon, the _counter value is incremented and setState is called to trigger a rebuild of the StatefulWidget and you see the counter value change.
Side Note
There are ways to update your UI automatically, usually using State Management. But this might still use setState under the hood.
Under the hood
To understand what’s really going on under the hood of StatelessWidget and StatefulWidget we have to go back to the Widget Tree. A Widget Tree is a tree of widgets that defines a blueprint for how your application should look and behave. The Element Tree and the Render Tree are using that blueprint to actually implement those looks and behaviors.
The difference between StatelessWidget and StatefulWidget can be found in the Element Tree.
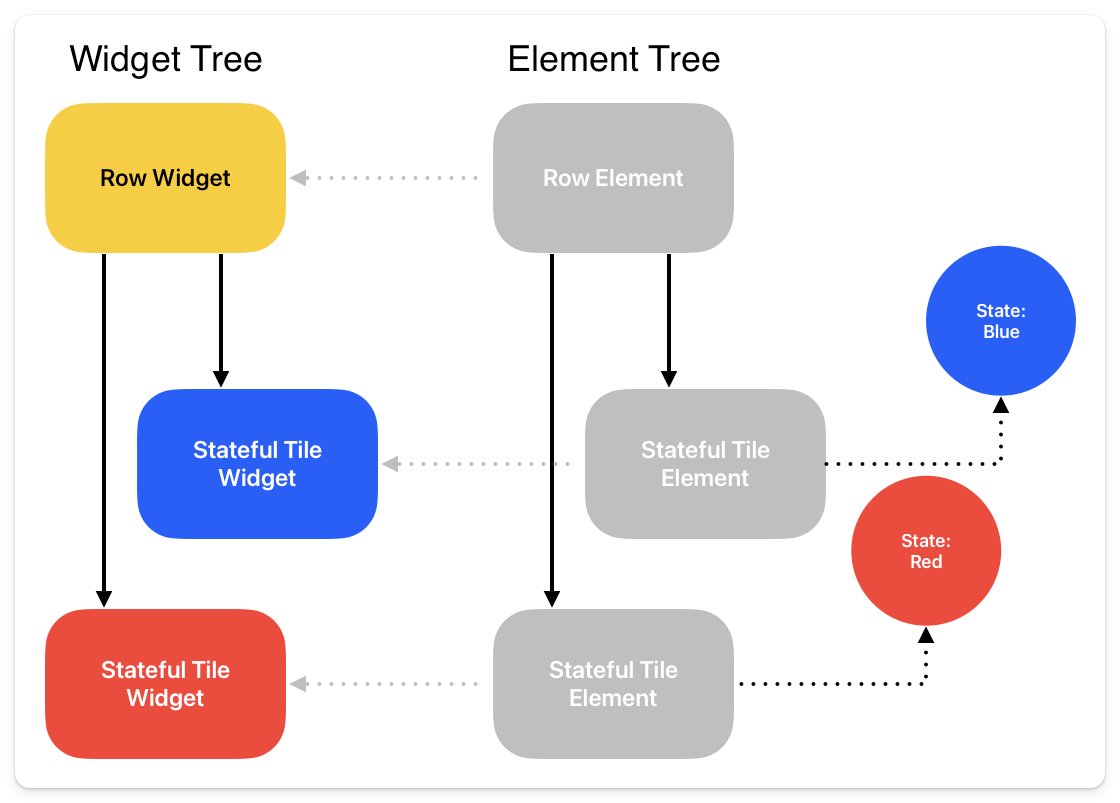
The Element Tree is in charge of the location and state of the widget. You can read more about that in the BuildContext doc. So while StatelessWidgets just create an Element in the Element Tree, StatefulWidgets create an Element and an associated state with that Element. And understanding this will be important when using Keys.